During a recent engagement we encountered Xerox WorkCentre printers using default credentials (admin:1111). Usually it’s just another finding, but this time we noticed the printer had SMB and e-mail credentials configured. For LDAP we usually point the printer to our own IP and get access to the plaintext creds that way. But in the case of the SMB creds we’d receive a hash. So we decided to export the configuration in hopes of finding the plaintext password. This is when we encountered the DLM format and two separate blogs that helped us get to the plaintext creds.
To be clear, this is no new research but it took me 60 minutes to understand the blogs, and execute the steps. One of the bloggers chose not to disclose the static encryption key used by Xerox. So this blog is for the next pentester that encounters this and is not in the mood of booting up Ghidra to get to the static encryption key. This blog is here just as a quick and dirty instruction to get you on your way. If you want to actually know the background read: From Patched to Pwned and Printer Tricks Episode II – Attack of the Clones. They’re way more in depth.
Getting the clone file.
Log into the web interface, go to properties->General Setup and select cloning. Select all settings and click “clone”. You’ll be redirected to another page and download the file.
Handling the DLM.

The config backup is essentially a tar.gz file with a Xerox header on top of it. Cut off the header using VI until it gets to the binary data. You’ll see it, don’t worry. (technique taken from the “From Patched to Pwned” article.)
Finding credentials.
unpack the file and search for either “password” or 0x to find binary data. Maybe you already know for which services you need it. If you find them cut of the “0x” part and execute the following command:
echo “<extracted password>” | xxd -r -p | openssl aes-256-cbc -K 36524257707442476d625044626d3334 -iv 0 -d
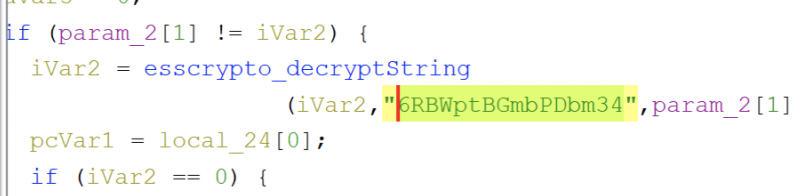
The command was lifted from the “Printer Tricks Episode II – Attack of the Clones” blog. The only thing i did was get the actual static key.
Ghidra fun times.
I got the key by downloading the firmware, unpacking, and loading “createClone” into Ghidra. From there I filtered on “crypto” to find the esscrypto_decryptString function. And then find the references to the function, clicked around, and found the call: